My passwords live on a VPS I rent and manage myself. Here's how I ended up there, what it took to set up, and the handful of things that tripped me up along the way — including one config mistake that had me staring at the logs for a solid ten minutes before the penny dropped.
From Google Passwords to Vaultwarden: Taking Control of My Digital Security
I started out like most people, just letting Google Password Manager do its thing, until I stumbled on a blog post casually mentioning that Google used to store passwords in plain text (talk about a yikes moment). That sent me searching for something safer, so I landed on LastPass. It was pretty great while it was free and simple, but then they dropped that bombshell about limiting device types—sigh, suddenly using it on both my phone and laptop wasn’t free anymore. Of course, my search didn’t stop there; I gave Bitwarden’s hosted version a spin (and even paid for a year), but autofill felt clunky, OTP and hardware key 2FA cost extra, and, I’ll admit, the UI didn’t really spark joy for me. For a while, I enjoyed 1Password through a one-year freebie from GitHub Education Pack and liked almost everything about it (honestly, a solid option—just a bit pricey in the long term). Eventually, though, I wanted something open-source and self-hosted, which is how I stumbled onto Vaultwarden—a lightweight, do-it-yourself alternative to Bitwarden. At first I wasn’t totally sure, but the idea of finally controlling my own password vault (no more rule changes or random subscription hikes!) was too tempting to pass up. So, I decided to give it a shot—set it up on my own hardware, fiddled with a few configs, crossed my fingers… and honestly, I’m glad I took the plunge. It’s been running smoothly ever since, and I love that I’m not at the mercy of some big company’s latest policy shift.
Setting Up Vaultwarden with Docker and Traefik
When it came time to actually get Vaultwarden up and running, Docker was a total no-brainer for me—honestly, pretty much everything on my server already lives in its own cozy Docker container. The basic setup is super straightforward: just pull the image, stick your data folder somewhere persistent, and go. If you’re keeping it simple, you can use the official docker run command or a quick-and-dirty docker-compose.yaml (there are examples right in the docs, which I love, because copy-paste always makes life easier).
But, of course, I can never leave well enough alone—I wanted to tuck Vaultwarden behind my existing Traefik reverse proxy, so it would get a real SSL cert and be neatly accessible on my domain. So I tweaked the docker-compose file a bit: tossed in the Traefik labels (for auto-routing and TLS), filled out my SMTP settings so Vaultwarden could email me when needed (a total must if you ever want to do account recovery!).
services:
  vaultwarden:
    image: vaultwarden/server:latest
    container_name: vaultwarden
    restart: unless-stopped
    environment:
      DOMAIN: "example.com"
      ADMIN_TOKEN:
      SMTP_HOST:
      SMTP_PORT:
      SMTP_SECURITY:
      SMTP_FROM:
      SMTP_USERNAME:
      SMTP_PASSWORD:
    volumes:
      - ./vw-data/:/data/
    labels:
      - "traefik.enable=true"
      - "traefik.http.routers.vaultwarden.entrypoints=websecure"
      - "traefik.http.routers.vaultwarden.rule=Host(`example.com`)"
      - "traefik.http.routers.vaultwarden.tls.certresolver=resolver"
      - "traefik.http.routers.vaultwarden.middlewares=cloudflare-middleware@file"
Admin Token: Where I Messed Up (So You Don't Have To)
Okay, quick confession time: the first time I tried to set up the ADMIN_TOKEN for Vaultwarden in my docker-compose, I did exactly what you shouldn’t do. I generated my admin token hash (using vaultwarden hash—super easy, you just run it in a temp Vaultwarden container and it spits out the nice, secure Argon2 string).
# Via docker and creating a temporary container
docker run --rm -it vaultwarden/server /vaultwarden hash
Then I copied it into my compose file, spun everything up… and then promptly facepalmed at the error message screaming at me from the logs. Turns out, the Argon2 hash has a bunch of $ symbols in it, which Docker Compose tries to interpret as environment variables unless you escape them. Here's the trick: in your docker-compose.yml, replace every single $ with $$ in the ADMIN_TOKEN (so yes, there will be a ridiculous amount of dollar signs, but trust me, it works).
First Steps in the Admin Panel
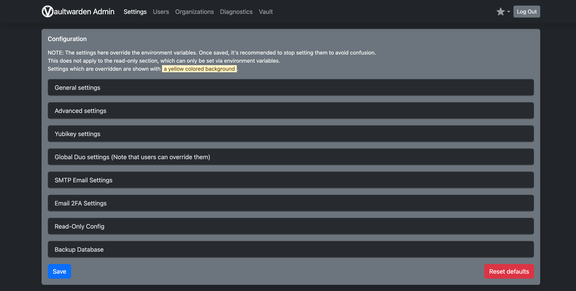
Once you’re logged into the Vaultwarden admin panel with your fancy new admin token, I really recommend taking some time to browse through all the available settings. One of the first things I always do is head to the “General settings” section and turn off “Allow new signups”—that way, random strangers won’t stumble in and start creating accounts on your server (especially important if your instance is exposed to the internet).
But honestly, the admin panel can do a lot more than just manage signups. You’ve got options for setting up SMTP for emails—which is super useful for password resets, invites, and two-factor auth stuff. If you didn’t set up your SMTP settings in the environment variables (like in the docker-compose file above), don’t worry!
Beyond that, you can tweak backup options, play with different 2FA/security settings, and just generally poke around in all those advanced tweaks Vaultwarden offers. Everything is nicely grouped, so it’s pretty easy to find your way around. Personally, I just clicked through and set anything that looked even remotely security-related or useful, and it seriously paid off.
Living on a Public Domain (Behind Traefik)
Now that the admin panel is locked down, there's a bigger question hiding behind it: how reachable should this thing be from the outside world at all?
My instance sits on a public domain, behind the same Traefik reverse proxy that fronts everything else on my server. Traefik handles the certificate automatically, forces HTTPS, and Vaultwarden itself never talks to the internet directly — it only listens on the internal Docker network and Traefik does the talking. That's a big part of why I was comfortable exposing it at all: the container isn't publishing any ports of its own, and there's exactly one well-tested piece of software sitting in front of it.
I did consider hiding the whole thing behind a VPN instead, and that's genuinely the safer option — if nothing is listening publicly, nobody can poke at it. But it means having that tunnel up on every device all the time, including my phone, and the one moment you really need your passwords is the exact moment the VPN decided to drop. A password manager you hesitate to open is a password manager you stop using, and then you're back to reusing the same password everywhere, which defeats the entire point.
So: public, but with the boring hygiene turned all the way up. Signups disabled, invitations only, TLS enforced by Traefik, and — the part most people miss — the admin panel switched off entirely.
Here's the trick: once you've clicked through all the settings you care about, just delete (or comment out) the ADMIN_TOKEN line from your compose file and restart the container. Vaultwarden will tell you the admin panel is disabled, and /admin stops being an attack surface at all. When you actually need it again, put the token back for five minutes and take it out afterwards. It costs you one docker compose up -d and removes an entire login page from the internet.
Connecting Bitwarden Clients to Your Vaultwarden Instance
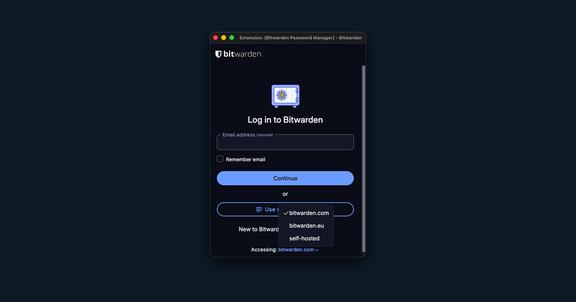
Alright, so you've got Vaultwarden up and running, but here's the thing—the official Bitwarden apps (phone, desktop, browser extension) are all hardcoded to connect to Bitwarden's hosted servers by default. The good news? It's super easy to point them at your own Vaultwarden instance instead. You just need to tell each client where to find your vault, and boom, you're off to the races.
Turning On 2FA (a.k.a. the Stuff I Used to Pay For)
Remember how I complained that Bitwarden wanted money for OTP codes and hardware key support? Yeah. On your own Vaultwarden instance, all of it is just… there.
You can enable a regular TOTP app, a FIDO2/WebAuthn hardware key, Duo, or email codes. I went with a hardware key as the primary method and TOTP as backup, which is a combination I'd have been paying a subscription for otherwise.
Two things worth knowing before you flip the switch:
Don't store your Vaultwarden TOTP secret inside Vaultwarden. It sounds obvious written down, but it's an incredibly easy mistake to make when you're in "add everything to the new vault" mode. If the only copy of the code that unlocks your vault lives in the vault, you've built yourself a very elegant locked room. Put it in a separate authenticator app, or on a second device.
Write down the recovery code. Not in a text file on the same machine — actually print it or write it on paper and put it somewhere you'd keep a passport. This is your way back in if you lose your phone and your hardware key on the same bad weekend.
Also, if you want email-based 2FA, this is where those SMTP settings from earlier finally pay off. Test them before you rely on them — send yourself an invite or trigger a password hint and make sure the mail actually lands. Discovering your SMTP config is broken at the exact moment you need a login code is not a great time.
Biometrics, and Why It Quietly Refused to Work
This one cost me a solid half hour of confused clicking, so here it is for the next person.
On mobile it just works — install the Bitwarden app, point it at your server, enable fingerprint or Face ID in the settings, done.
The browser extension is where it gets sneaky. Unlocking the extension with your fingerprint or Windows Hello is not a feature of the extension itself. It borrows the biometric prompt from the desktop app, which means three things all have to be true at once:
The Bitwarden desktop app is installed and logged into your Vaultwarden instance.
Browser integration is enabled in the desktop app's settings (and biometric unlock is turned on there too).
The desktop app is actually running in the background.
That third one is the killer. Close the desktop app window and the biometric option in the extension doesn't throw a helpful error — it just silently isn't there, and you're back to typing your master password like a caveman.
The fix is to leave the desktop app running permanently: enable "start automatically on login" and "minimize to tray on close" in its settings. After that it sits quietly in the tray, the extension finds it every time, and the fingerprint prompt shows up exactly when you expect it to.
My Half-and-Half Import: Migrating from 1Password to Vaultwarden
Moving my passwords from 1Password to Vaultwarden turned out to be less of a big bang and more of a slow evolution. I’ll be honest—I didn’t want to just dump hundreds of logins into Vaultwarden all at once, especially since half the stuff in my old vault was ancient, unused, or just plain junk. So right now, I’m actually running both extensions at the same time: 1Password is there as my old trusty “archive,” and Vaultwarden is where I’m actively saving new stuff or logins I genuinely need.
To keep things sane, I’ve got autofill turned on only for Vaultwarden, so I’m gently nudging myself to use it for my day-to-day logins. When I come across a site that’s still only in 1Password? Quick copy, manual paste, and then I add it properly to Vaultwarden. It’s a bit of a hybrid approach, but it works! That way, I only end up importing the passwords I really use, instead of cluttering up my new vault with a bunch of ancient logins for sites that probably don’t even exist anymore. Maybe not the fastest method, but honestly, it feels so much cleaner than blindly importing everything.
Wait, What If My Server Dies?
This is the question everyone asks the second you say "self-hosted password manager," and honestly it was my own biggest hesitation too. My passwords sit on a VPS that I'm responsible for. What happens when the provider has a bad night, or a migration goes sideways, or I fat-finger something in the compose file at 2 AM?
The reassuring answer: not much, at least not immediately. The Bitwarden clients keep an encrypted copy of your vault locally. If the server is unreachable, you can still unlock the app and read every password you already have. Your day-to-day logins keep working like nothing happened.
What you lose is syncing. New entries won't propagate to your other devices, changes made on your phone won't reach your laptop, and you can't log in on a brand new device at all. So it's an inconvenience with a deadline, not a catastrophe.
And if the server is gone permanently — dead drive, no backup, the whole nightmare — that local copy is your last remaining copy. Do not log out, do not reinstall the app. Open it, export the vault to a file, and only then start rebuilding.
Which is, of course, the long way around to saying: back it up. Whatever your backup routine ends up looking like, treat it as non-negotiable. Taking control means taking responsibility, and nobody is going to restore this for you.
Was It Actually Worth It?
Months in, yes — but I want to be honest about who this is actually for.
If you already run a server, already have a backup routine you trust, and genuinely enjoy this kind of tinkering, Vaultwarden is fantastic. It's light, it's been rock solid, it gives me every feature I used to pay for, and nobody can change the rules on me halfway through the year. That last part is the whole reason I started this journey, and it's the part I appreciate most.
If none of that describes you, though, please don't self-host your passwords out of principle. A password manager is the single worst place in your setup to learn lessons the hard way. Hosted Bitwarden is cheap and excellent, 1Password is genuinely lovely, and either of them is dramatically better than a vault you set up once, never backed up, and quietly stopped trusting.
What would I do differently? Set up backups on day one instead of day thirty, and disable the admin panel right after the initial configuration rather than leaving it sitting there for weeks.